Saturday, December 29, 2012

Sweet Potato Pancakes- a Leftovers Recipe

We have so much food leftover from the holidays!  Between Christmas Eve and Christmas Day, I feel like we will never have to go to the grocery story again (actually, that is a lie- I went today to get ingredients to make new things with the left overs).  My husband is pretty good about leftovers- as long as I mix them up a bit.  Tomorrow we are going to have bean soup (with leftover ham and potatoes), and we have been eating Turkey and Dressing for days.  I also made a big batch of Macaroni and Cheese with leftover cheese cubes.  This morning I felt it was time to do something with the sweet potatoes.  I made my Candied Sweet Potatoes in Orange Cups for Christmas day, I felt sure there was something exciting I could do with the leftovers.  Enter, Pancakes.  These were amazing.  I would probably make more sweet potatoes to make these pancakes again.


You Will Need:
1 Serving Candied Sweet Potatoes in Orange Cups , orange cups discarded or 1 cup left over sweet potatoes
1/2 cup Bisquick (I used the gluten free Bisquick)
1/2 cup milk
1 egg

Directions:
Mash the sweet potatoes in a bowl and mix in the rest of the ingredients.  Coat a skillet with cooking spray and drop spoonfuls of the batter on the hot pan.  The batter is thicker than regular pancake batter, so you might have to spread it out with the back of a spoon.

Don't eat it straight from the bowl- there is raw egg!

Cook a few minutes per side over medium heat, flipping with the pancake begins to puff up.  Serves 2.  My husband ate the whole batch by himself.  At 15 grams of protein, and 430 calories (plus the butter and syrup), he was certainly full- but he really enjoyed them.

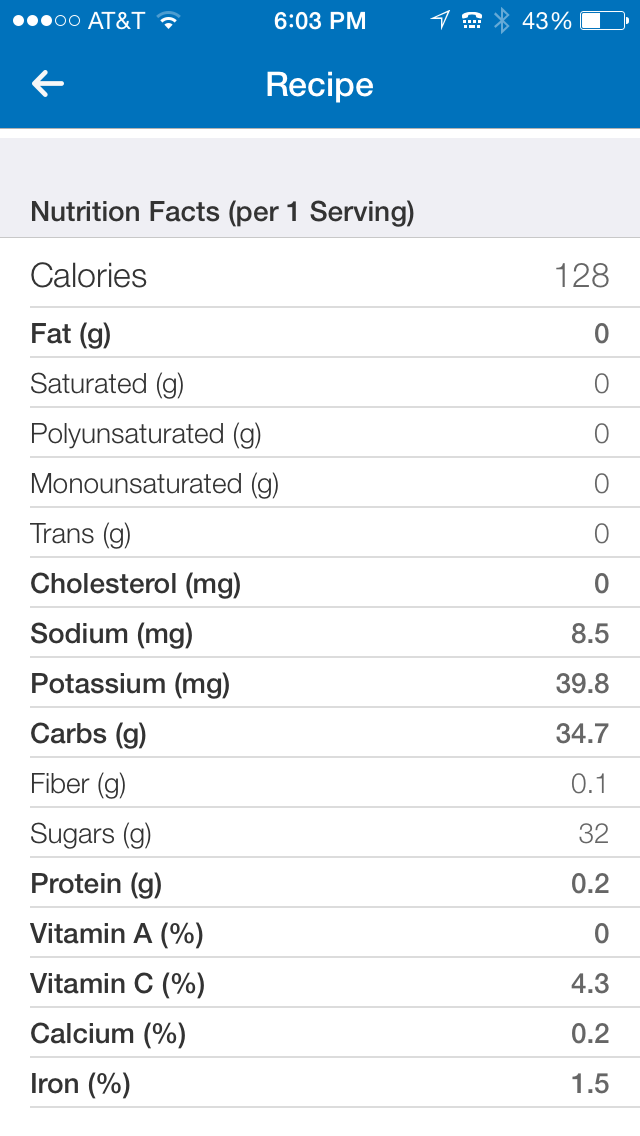
Nutritional Information per serving as calculated by My Fitness Pal

Sunday, December 16, 2012

Orange Scented Sweet Potatoes

I love so many different holiday foods, but I think this is one of my favorites.  Orange Scented Sweet potatoes.  The candied part is a little misleading...mostly because over the years I have cut out a lot of the "candy", however I still follow the same basic steps I learned from my mom.  You can really use any sweet potato recipe- baked, mashed, candied- the key to this dish is the orange cups.  They add such a nice hint of orange flavor.  Plus, when you fill them with the sweet potatoes, they almost look like little oranges!


These sweet potatoes always appear at Thanksgiving and Christmas with my Ham and Green Bean Casserole.  Sometimes, if I am feeling confident during the week, I will make my lazy version*.

You Will Need:
Sweet potatoes- 1/2 a potato per person + leftovers
Navel Oranges- 1/2 per person + leftovers (you are aiming for 1 serving of potatoes per orange half)
2 TBSP butter
2 TBSP - 1/4 cup honey (optional)
1/4 cup of water
Cinnamon
Cloves
Nutmeg
Electric Skillet (what my mom always used, so its what I use.)
Baking dish
Chopped Pecans *optional
Mini Marshmallows *optional

Directions:
Bake, boil or microwave your sweet potatoes until they are soft.  I baked mine at 425 degrees for 1 hour.  Let the potatoes cool, and then peel and dice into uniform cubes.  Melt the butter in your electric skillet over the warm setting.  Place the potatoes in the electric skillet and drizzle the honey (start with a little, you can add more later) over the top.  Sprinkle with Cinnamon, Cloves and Nutmeg.  I never measure these spices, I just follow my mother's rule of "sprinkle it until you smell it".  Gently toss the potatoes so the honey and spices are evenly distributed.  If the pan looks dry, add a small splash of water and turn the dial on the electric skillet to 250 degrees. Cook for ten minutes, then taste the potatoes.  You may want to add more honey or a pinch of salt.  I usually find a pinch of salt will make everything seem sweeter without a lot more honey or sugar.  Check again to see if you need to add water.  You should have a small amount of liquid in the bottom of the pan.  Increase the heat to 300 degrees.  We want the potatoes to caramelize and get a slight crust.  While your potatoes are crusting, slice each orange in half (one side will have the stem, the other will have the navel), scoop out the flesh and place the halves in a baking dish.  Check the potatoes to see if they have developed a crust.  If they have, turn the skillet off and distribute the potatoes in the orange cups.

If you are making the sweet potatoes in advance, like I do, cover the pan with aluminum foil and freeze until Holiday Eve.  If not, top with marshmallows and chopped pecans and place under the broiler for a few minutes until brown and bubbly.

Yes, we scooped out perfectly good oranges and used the skins for decoration- but now you have a reason to eat the fruit you keep saying you should eat.  You could also freeze the orange sections to use in smoothies!  Or just make some Sangria...

*Occasionally, I will get lazy and make these sweet potatoes without the orange cups.  They are almost as good, but they are much easier.  Swap the water for orange juice and add a sprinkling of orange zest.  You will also need to watch the pan to make sure it doesn't burn.  Keep a little water near by to add to the pan if things look like they are getting to sticky.  Depending on your desired sweetness, you may want to add the honey at the end after tasting.

Saturday, December 15, 2012

That Chocolate Thing That Willie Made- aka Chocolate Truffle Loaf with Raspberry Sauce

Growing up, I don't remember my maternal grandmother (Willie) cooking a lot.  That might be because my uncle is a chef, or maybe she did and I don't remember it.  I do remember her watching football, knitting or playing solitaire...so I think maybe she just didn't cook a lot.  However, I do remember a few particular dishes that only she made:

Macaroni and Cheese (the real kind)
Cheese on toast
Giblet Gravy
Something containing pearl onions that my dad liked at the holidays
Standing Rib Roast
Stuffing
Some sort of salad at every meal,
and...That Chocolate Thing- also known as Chocolate Truffle Loaf with Raspberry Sauce.

My once cousin claimed you cant make macaroni and cheese like hers unless you have the cup with the red lid that she used to shake up the flour and milk- but I think mine comes pretty close.  Cheese on toast as been a breakfast staple as long as I can remember.  I am sure if anyone other than her ate the giblets I could figure out how to make giblet gravy...and other than onions, I don't know what is in that onion dish.  But the Chocolate Thing- that I just found her recipe for.

Once we convinced my grandparents they needed a computer and internet, my grandmother took to it pretty well.  I would send her papers to proof read, she liked to get emails from my cousin when he was deployed, and then there online shopping.  I think she liked the convenience of it...especially at Christmas.  One year, I came home from work to find package on my doorstep from Pet Smart.  I immediately called her to make sure I didn't need to poke holes in the box.  At first I thought she had shipped us a kitten- turns out it a kitty safe de-icer for my dad.

A few years before she passed, I asked her to send me the recipe for The Chocolate Thing.  I had already mastered her stuffing and I was starting to branch out a little more when it came to cooking.  Having once told me I would never meet a man and get married if I didn't cook (she may have been right about that), she was happy to send it.  She sat down at her computer, typed it up (there was no link to just direct me to)- either from memory or the scrap of paper torn out of a magazine, and sent it on its way.  I have only made it a handful of times.  There are more steps and required concentration than I usually like in a recipe, but it is so worth it.

You Will Need:
2 cups heavy cream- divided
3 egg yolks, slightly beaten
2 pkgs (8 oz each) Baker's Semi-Sweet Chocolate
1/2 cup Karo syrup- light or dark
1/2 cup margarine or butter
1/4 cup confectioners sugar
1 tsp vanilla
Raspberry Sauce (below)

Line 8 1/2 x 4 1/2 x 2 1/2 loaf pan with plastic wrap. Mix 1/2 cup cream with egg yolks. In 3 qt.

saucepan stir chocolate, corn syrup, and margarine over medium heat until melted. Add egg mixture. Stirring constantly, cook 3 minutes. Cool to room temperature.

Microwave instructions: In 3 qt. microwavable bowl mix chocolate, corn syrup, and margarine. Microwave on High, stirring twice 2 to 2 1/2 minutes or until melted. Stir in egg mixture. Microwave, stirring twice, 3 minutes.


Beat remaining cream, sugar, and vanilla until soft peaks form. Fold into chocolate until no streaks remain. Pour into pan. Refrigerate overnight or chill in freezer 3 hours. Slice and serve with sauce. Serves 12 


Raspberry Sauce: 
In blender puree 1 pkg. (10 oz.) frozen raspberries, thawed. Strain. Stir in 1/3 KARO corn syrup. Serve over slices of truffle.

I remember these being pretty big servings, so you could probably stretch the desert to more than 12 people if you are serving a larger meal or as part of a party.  However, this desert must be kept cold, so I don't recommend serving it from a buffet. 

Monday, December 10, 2012

Gluten Free Baked Donuts- 365 Recipe Challenge

I love Pinterest.  You might say it borders on Pinsanity.  Either way, Pinterest led me to this awesome recipe for Baked Donuts.  Of course, I needed to modify it for gluten free purposes, but it was super easy- and fast.  I think it is going to be great for Christmas morning.  We usually have a light treat (donut, coffee, etc) before we open stockings and while we wait for everyone to gather.  Then, between stockings and presents we have breakfast.  I like to make Christmas morning last as long as possible.  I probably wont make these the morning of, since I really don't want to mess up my kitchen that early, but I will definitely make them the night before.  As someone who is used to having to defrost ALL of my gluten free baked items, it is no big deal to pop something briefly in the microwave (although they are just as delicious cold!). I originally thought I would just freeze most of the test batch, but after the look on my husbands face, I don't think we will have leftovers.  Since the hubs and I are counting calories as well, I figured out the nutritional information as well.  I am sad to say these are no better for you than a traditional donut hole (about 80 calories each)...unless you eat them plain.  Oh well, at least they are preservative free.

Cinnamon Sugar and Powdered Sugar.  Baby Donut Sweetness!

You Will Need:
1 1/2 cups (leveled) Pamela's Artisan Flour (for a non gluten free version, use regular flour)
1/2 cup granulated sugar + more for cinnamon sugar dusting
2 tsp baking powder (if you substitute a gluten free baking mix like Bisquick or Bob's Red Mill, you probably wont need this, but I have not tested it. You will need it if you use Pamela's Baking Mix.)
1/4 tsp  salt
1 egg
1/2 cup milk (I used 1%)
1/4 melted butter (make sure it cools to room temp so you don't scramble the egg) + more for dusting
1 tsp vanilla
cinnamon (optional)
powdered sugar (optional)

Directions:
Mix the flour, sugar, baking powder and salt in a bowl.  In a large measuring cup, mix the milk, egg, butter and vanilla and then add the wet to the dry ingredients.  Stir until incorporated.  The batter should be pretty sticky.  If it seems dry add a little more milk or water.  Mine did not need any more liquid.  Really, we are making tiny breakfast cupcakes, so it should look similar (although slightly less pourable) to cake batter. Scoop into greased, unlined mini muffin tins.  If you line the tins you wont get the golden brown outside- it will be more muffin like.  If you must line your muffin tin, make sure you unwrap them before storing leftovers.  Gluten free muffins tend to "sweat".  Bake at 350 for 8-10 minutes.  My oven took the full 10 minutes.  Additionally, the instructions on the bag of Artisan flour recommend placing items in the upper third of the oven for best browning.  Mine were still pretty pale, but they were cooked through.

Don't blonds have more fun?  They are certainly delicious!
To dust, dip the top of the muffin in the melted butter and dust with your desired toppings.  I mixed 2 parts sugar to 1 part cinnamon to make cinnamon sugar.  Regular donuts are tossed in the sugar right after frying so the grease acts as a binding agent.  Since we aren't frying them the melted butter is our binding agent.  You can also follow the instructions in the link for her glaze- but we aren't glaze people in our house.  You could also frost these with your favorite frosting or dip them in melted chocolate.  Mmmm...chocolate.

I hope all the gluten free people out there enjoy an chance to eat donuts!  I have never wanted a donut pan or a deep fryer before, but now I find myself thinking I need one.  :)

That's What's for Breakfast!

Sunday, December 9, 2012

Wassail Tea

Here is a quick and easy recipe for a warm cozy holiday beverage.  Wassail Tea.  It makes a lot, so if you are planning on serving it out of a standard size crock pot at your next holiday party, know that you will need to halve the recipe.  Also, you will need a large pot to hold all the ingredients.  7 quarts = 28 cups: I don't own a pot that big, so I always halve the recipe.  The full recipe will serve about 20 people.  However, you can refrigerate the leftovers and just heat up a single serving at a time.

You Will Need:
7 quarts water
2 1/4 cups raw, local honey
1 cup lemon juice
1 TBSP whole cloves
4 sticks cinnamon
10 tea bags (like you'd use for iced tea)
2 cups unsweetened cranberry juice*

*I think this tea is pretty sweet.  Not make your teeth ache sweet, but pretty darn sweet.  If you need it to be sweeter, add more honey to taste.  If you can not find unsweetened cranberry juice, cut the honey in half to start, adding more if necessary

Directions:
Bring the water, honey, lemon juice to a boil along with the cloves and cinnamon sticks.  Once it boils, turn off the heat, and add the tea bags and juice.  Steep for 5-15 minutes, depending on how strong you want the tea flavor to be.  I am not a big fan of tea, so I usually pull the bags out at the 5 minute mark.  If you plan to leave the bags in longer than 5 minutes, I would also add 1/4 tsp of baking soda to the boiling water when you add the tea bags (it will help cut the bitter taste- works in iced tea too!).

Enjoy!

Nutritional Information as calculated by My Fitness Pal

Sunday, December 2, 2012

Grill Roasted Turkey- 365 Recipe Challenge


I know, I know.  You just finished off the last of your Thanksgiving Turkey and you haven't even begun to start thinking about your Christmas Turkey.  Well, I am here to tell you- you should be!  Christmas is only 23 days away!  For those of you already feeling inadequate, I have had my Christmas Eve and Christmas Day menu planned since Halloween!  Why you might ask?  Because that is what I do.  I start thinking about Halloween at my birthday, and I am in full holiday mode before the last jack-o-lantern has been smashed in the street by those annoying delinquent teenagers the next block over (which is also why we have a fake pumpkin now).  

Maybe you don't feel up to Christmas just yet?  Don't feel overwhelmed. Just make a plan, get your shopping done as early as possible and don't forget to delegate. I have embraced my Obsessive and Excessive holiday planning this year.  I am going to celebrate the holidays to their maximum capacity, but I am not going to make myself crazy.  Last week I sent a schedule to everyone coming for Christmas.  A little much? I don't think so.  Now everyone knows what the plan is and what needs to happen.  I like plans.  I like knowing what to bring, where to go, and when to be there.  For my husbands sake, I even listed naps (his favorite) and grocery trips (his least favorite).  

When it comes to the food, it is almost more important to plan ahead than at Thanksgiving.  With all the present opening and family visiting, who wants to be stuck in the kitchen? You have to make as many things as you can in advance.  You also need an action plan so you don't spend two days cooking by yourself and completely miss the holidays (yep, did that last year).  Enter, Grill Roasted Turkey.  Let the men be men and watch the Turkey this year.  Even better if you can send them all to the backyard with a 6 pack so you don't have to watch sports or worse, The History Channel.  They don't really have to do much, just stand around the grill, and occasionally baste the bird- but they will be out of your hair, and not napping while you do all the work.  You will have to prep the bird, and provide them with instructions, but the heavy lifting will be up to them.

You Will Need:
1 turkey, 1.5 pounds per person- washed and cavity searched
1 cup salt
1 cup sugar (whatever kind you have extra of)
1 TBSP black peppercorns
1 pack fresh holiday herbs (if you cant find them, just use some poultry seasoning.)
1 stick softened butter (you can also substitute 1/2 cup olive oil)
1 TBSP Poultry Seasoning
1 TBSP Cajun Seasoning (or salt and pepper)
Bits and pieces of carrot/onion/celery/lemon- whatever is left over from other recipes
2 heavy duty disposable aluminum pans
Aluminum Foil
Beach Towel
Turkey Thermometer (not the pop up timer that comes in the bird!)
Turkey baster


For the Turkey Brine (Christmas Eve): 
24 hours before you plan on cooking, boil a large pot of water with 1 cup salt, 1 cup sugar (white, brown, both- whatever), 1 tbsp black peppercorns.  Once the sugar and salt dissolve, remove from heat and add in 1/2 pack of holiday herbs.  Allow the water to cool (add ice, cold water, etc) Place your clean turkey (neck, giblets removed- do that cavity search!) in a cooler or 5 gallon bucket.  Pour the  COOL water mixture over the turkey.  Make sure your water is not hot or you will cook the turkey! Add enough water and ice so the turkey is completely submerged.  Place bags of ice in the water to keep the turkey cold.  Flip the turkey over at the 12 hour mark.  Check the ice frequently, swapping out the melted ice bags for fresh ice as needed...just don't let the water freeze.

To cook the Turkey (Christmas Day):
Remove the turkey from the brine and rinse well.  Don't forget to rinse, it will be too salty otherwise.  Sprinkle the cavity with salt and pepper.  Place bits of onion, celery, the rest of the holiday herbs, carrots, lemon ( whatever makes you happy) inside.  Mix the softened butter, poultry seasoning, and cajun seasoning together.  Dry the turkey really well, and rub the butter mixture all over the skin.  Place the turkey in the disposable roasting pans (use both so they don't collapse), on top of more veggies (the same that you shoved inside). Cover with aluminum foil an cook 15 minutes per pound.  After you reach the 2 hour mark, baste every 15  minutes  (leave the foil off at this point).  Keep the grill between 350-450.  Remove the Turkey from the grill with the internal temp is between 160-165 (the timer that comes with the Turkey will not pop).  Replace the foil, cover with beach towels, and allow to rest 20 min-1 hour.  

DO NOT CARVE THE TURKEY UNTIL YOU ARE READY TO EAT.  WHEN EVERYTHING ELSE IS DONE, AND SOMEONE IS MAKING GRAVY, THEN YOU MAY CARVE THE TURKEY.   Seriously, the turkey needs time to rest.  The beach towels will keep it hot and carving it too soon will only make it dry.  

That's What's for Christmas Dinner!