Sunday, December 9, 2012

Wassail Tea

Here is a quick and easy recipe for a warm cozy holiday beverage.  Wassail Tea.  It makes a lot, so if you are planning on serving it out of a standard size crock pot at your next holiday party, know that you will need to halve the recipe.  Also, you will need a large pot to hold all the ingredients.  7 quarts = 28 cups: I don't own a pot that big, so I always halve the recipe.  The full recipe will serve about 20 people.  However, you can refrigerate the leftovers and just heat up a single serving at a time.

You Will Need:
7 quarts water
2 1/4 cups raw, local honey
1 cup lemon juice
1 TBSP whole cloves
4 sticks cinnamon
10 tea bags (like you'd use for iced tea)
2 cups unsweetened cranberry juice*

*I think this tea is pretty sweet.  Not make your teeth ache sweet, but pretty darn sweet.  If you need it to be sweeter, add more honey to taste.  If you can not find unsweetened cranberry juice, cut the honey in half to start, adding more if necessary

Directions:
Bring the water, honey, lemon juice to a boil along with the cloves and cinnamon sticks.  Once it boils, turn off the heat, and add the tea bags and juice.  Steep for 5-15 minutes, depending on how strong you want the tea flavor to be.  I am not a big fan of tea, so I usually pull the bags out at the 5 minute mark.  If you plan to leave the bags in longer than 5 minutes, I would also add 1/4 tsp of baking soda to the boiling water when you add the tea bags (it will help cut the bitter taste- works in iced tea too!).

Enjoy!

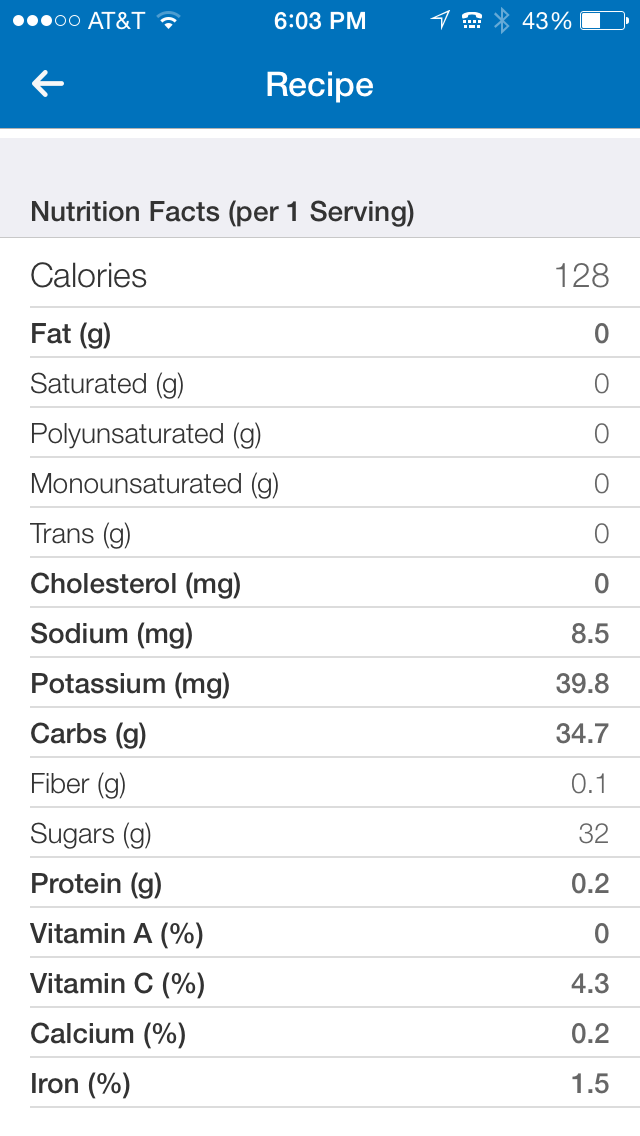
Nutritional Information as calculated by My Fitness Pal

Sunday, December 2, 2012

Grill Roasted Turkey- 365 Recipe Challenge


I know, I know.  You just finished off the last of your Thanksgiving Turkey and you haven't even begun to start thinking about your Christmas Turkey.  Well, I am here to tell you- you should be!  Christmas is only 23 days away!  For those of you already feeling inadequate, I have had my Christmas Eve and Christmas Day menu planned since Halloween!  Why you might ask?  Because that is what I do.  I start thinking about Halloween at my birthday, and I am in full holiday mode before the last jack-o-lantern has been smashed in the street by those annoying delinquent teenagers the next block over (which is also why we have a fake pumpkin now).  

Maybe you don't feel up to Christmas just yet?  Don't feel overwhelmed. Just make a plan, get your shopping done as early as possible and don't forget to delegate. I have embraced my Obsessive and Excessive holiday planning this year.  I am going to celebrate the holidays to their maximum capacity, but I am not going to make myself crazy.  Last week I sent a schedule to everyone coming for Christmas.  A little much? I don't think so.  Now everyone knows what the plan is and what needs to happen.  I like plans.  I like knowing what to bring, where to go, and when to be there.  For my husbands sake, I even listed naps (his favorite) and grocery trips (his least favorite).  

When it comes to the food, it is almost more important to plan ahead than at Thanksgiving.  With all the present opening and family visiting, who wants to be stuck in the kitchen? You have to make as many things as you can in advance.  You also need an action plan so you don't spend two days cooking by yourself and completely miss the holidays (yep, did that last year).  Enter, Grill Roasted Turkey.  Let the men be men and watch the Turkey this year.  Even better if you can send them all to the backyard with a 6 pack so you don't have to watch sports or worse, The History Channel.  They don't really have to do much, just stand around the grill, and occasionally baste the bird- but they will be out of your hair, and not napping while you do all the work.  You will have to prep the bird, and provide them with instructions, but the heavy lifting will be up to them.

You Will Need:
1 turkey, 1.5 pounds per person- washed and cavity searched
1 cup salt
1 cup sugar (whatever kind you have extra of)
1 TBSP black peppercorns
1 pack fresh holiday herbs (if you cant find them, just use some poultry seasoning.)
1 stick softened butter (you can also substitute 1/2 cup olive oil)
1 TBSP Poultry Seasoning
1 TBSP Cajun Seasoning (or salt and pepper)
Bits and pieces of carrot/onion/celery/lemon- whatever is left over from other recipes
2 heavy duty disposable aluminum pans
Aluminum Foil
Beach Towel
Turkey Thermometer (not the pop up timer that comes in the bird!)
Turkey baster


For the Turkey Brine (Christmas Eve): 
24 hours before you plan on cooking, boil a large pot of water with 1 cup salt, 1 cup sugar (white, brown, both- whatever), 1 tbsp black peppercorns.  Once the sugar and salt dissolve, remove from heat and add in 1/2 pack of holiday herbs.  Allow the water to cool (add ice, cold water, etc) Place your clean turkey (neck, giblets removed- do that cavity search!) in a cooler or 5 gallon bucket.  Pour the  COOL water mixture over the turkey.  Make sure your water is not hot or you will cook the turkey! Add enough water and ice so the turkey is completely submerged.  Place bags of ice in the water to keep the turkey cold.  Flip the turkey over at the 12 hour mark.  Check the ice frequently, swapping out the melted ice bags for fresh ice as needed...just don't let the water freeze.

To cook the Turkey (Christmas Day):
Remove the turkey from the brine and rinse well.  Don't forget to rinse, it will be too salty otherwise.  Sprinkle the cavity with salt and pepper.  Place bits of onion, celery, the rest of the holiday herbs, carrots, lemon ( whatever makes you happy) inside.  Mix the softened butter, poultry seasoning, and cajun seasoning together.  Dry the turkey really well, and rub the butter mixture all over the skin.  Place the turkey in the disposable roasting pans (use both so they don't collapse), on top of more veggies (the same that you shoved inside). Cover with aluminum foil an cook 15 minutes per pound.  After you reach the 2 hour mark, baste every 15  minutes  (leave the foil off at this point).  Keep the grill between 350-450.  Remove the Turkey from the grill with the internal temp is between 160-165 (the timer that comes with the Turkey will not pop).  Replace the foil, cover with beach towels, and allow to rest 20 min-1 hour.  

DO NOT CARVE THE TURKEY UNTIL YOU ARE READY TO EAT.  WHEN EVERYTHING ELSE IS DONE, AND SOMEONE IS MAKING GRAVY, THEN YOU MAY CARVE THE TURKEY.   Seriously, the turkey needs time to rest.  The beach towels will keep it hot and carving it too soon will only make it dry.  

That's What's for Christmas Dinner!

Friday, November 30, 2012

Planning Ahead With Freezer Meals

A friend of mine is going on a well deserved vacation (without the kids and husband) and, since she is a great wife and mother, she asked me for a few meals she could make in advance so the family doesn't starve or end up eating take out all week.  I have posted a few of my go-to recipes below. However, with a few modifications, a lot of your favorite meals can be freezer friendly.  We eat something out of our freezer at least once a week.  If the ingredients for a recipe are on sale, I make a double batch and freeze half of it for later use.  Add a salad, fruit or bread and your family probably wont realize it came out of the freezer.  Freezer night can also be desert night.  You saved time on dinner, why not spend the extra time with your kids and a sweet treat! Here are some of my other tips:

1.  Write the contents on the outside you don't have to play the guessing game later on.  If someone other than yourself will be reheating, cooking instructions are also helpful.  

2.  Unless you are sure the entire dish will be eaten within a day or two of defrosting, portion your meals into serving sizes.  You have already stretched the expiration date by freezing it, don't expect it to last an additional week in your fridge.  Also, it makes it a lot easier to take meals to work for lunch if you can let one serving defrost in your lunch box and then pop it in the microwave when it is time to eat (assuming it is has be cooked all the way through). 

3.  Freezer meals are not about presentation.  That is why casseroles, soups, chilies and stews work best.  Veggies may get a little mushy and other textures may change when they are defrosted.  Instead of having a biology lesson, just trust me on this.  Anything plant based will not look freshly picked, so don't fight it.  It is still just as good. Boxed meals from the store have preservatives and special equipment like flash freezers to make them look "normal".  Just freeze your meals right away (not after a week of hanging out in your fridge) and they will be just as good- even if they aren't beautiful.  However...

4.  Whenever possible, try not to freeze starches.  If you have the extra time to make fresh pasta, rice or bake a potato (even better if your microwave has a baked potato button) your meal will seem less "leftover".  

5.  If a recipe calls for eggs to be poured over and then baked (like in my breakfast casserole) save these ingredients until after you thaw them.  Also, I like to use egg beaters instead because they last longer and they are easier to measure- which makes things easier if you are taking the food to someone or just leaving instructions with your spouse. 

6.  If you make to much dinner one night, make your own hungry man meals.  Put your main dish, sides, etc in a microwave safe container, freeze and let your own hungry man feed himself.  

7.  I will eat the same thing every day for a month and not get tired of it.  My husband wont.  Whenever possible, try to re-purpose your meals.  If you make a pork loin or chicken; shred the meat, freeze the leftovers ( ideally with  a sauce- BBQ, salsa, enchilada, tomato, etc) and call it tacos/nachos/pizza/whatever the next time you serve it.  Again fresh toppings/ingredients make it seem new. 

8. Pasta sauces are another great freezer option.  Make it a meat sauce, hide some veggies (grated in carrots/broccoli, etc) and you have a complete meal if you can boil pasta.  They are also really cheap to make in bulk, and if you package them in single servings family members can choose their own sauce. 

A few recipes that can easily be made freezer ready:

Hillbilly Shepard's Pie:
Assemble as directed.  Freeze instead of baking.  Thaw in the refrigerator over night and bake according to directions.

Breakfast Casserole:
Prepare in advance except for the eggs, milk and cheese.  Refrigerate over night or freeze.  Bring to room temperature, add the eggs, milk and cheese.  Cook as directed. 
*note- this recipe calls for 3 eggs + 1/4 cup of milk.  You can substitute 3/4 cup of egg beaters + 1/4 cup milk to make things easier on someone who doesn't cook a lot.  *

Cincinnati Chili:
Prepare chili as directed and freeze in smaller batches or individual portions.  Thaw, re-heat in the microwave and serve over freshly cooked pasta or roasted spaghetti squash.  Pasta can be cooked in advance and refrigerated.  To re-heat, place the pasta in a colander and set in a bowl of hot water until warm- just like they do in resturants. 

Chicken and Chickpea Stew:
Freeze in smaller portions.  Thaw and reheat in the microwave. 

Taco Casserole:
Assemble according to directions.  Freeze instead of baking.  Thaw in the refrigerator over night and bake according to directions. 

I hope these help!  That's what's for dinner...next month. 

Sunday, November 25, 2012

Product Review: Pamela's Gluten Free Sugar Cookies

Today I have a product review for you.  Last time my husband and I went to our favorite grocery store, Sprouts, they were doing their Gluten Free Jubilee.  This is always super exciting, because it means the gluten free food I have to buy is on sale, so I can afford to buy a few extra treats (or just stock pile thinks like bread).  Baking mixes are one of the items we usually stock up on because we can keep them in the freezer and pull them out when we need them.  We got really excited to see that the Pamela's brand of gluten free products had come out with a lot of new mixes.  We bought a bunch of them, but today I am going to review the Pamela's Gluten Free Sugar Cookie Mix.

The plate matches my super cute heating pad! 
Sugar cookies have been one of the products that has been surprisingly hard to find gluten free.  Around the holidays I would kill for a tube of gluten free sugar cookies to slice and bake.  Alas, the only mixes I have ever found involved a lot of ingredients, steps, or both.  This mix only requires butter and 1 egg.  It also included instructions to make your own slice and bake cookies.  Also, I can not wait to make fruit pizza with it!

I let the butter soften on the counter.  I thought it was pretty soft, but in retrospect it could have been softer.  It didn't quite mix as well as it should have- so make sure your butter is really soft.  Or...set your bowl on a heating pad like I did and keep on beating.  After I had added all the ingredients I mixed...and mixed...and mixed waiting for the dough to come together like the package said.  Maybe my butter still wasn't soft enough, but my dough never came together.  However, having made pie crust last week, I hoped the wet sand looking dough I now had in the bowl might turn into dough if I rolled it out.  I reached in, grabbed a handful, and made a little ball.  Success!  The dough held together.

Because I am a little lazy, I decided to roll all the cookies into little balls and then press them out.  I didn't have any parchment or wax paper to roll out my cookies, and this just seemed a whole lot easier. I also ended up with 24 cookies instead of the 17 listed on the package.  I dipped some of the cookies in cinnamon/sugar, some were left plain, and the rest got sprinkled with Andes mints.

The package said to bake the cookies at 350 for 8-10 minutes.  At the 8 minute mark, my cookies were still really soft and mushy.  So they went for 2 minutes more...and the 2 minutes after that.  Big mistake.  The first batch came out pretty dry.  They never really browned around the edges, but upon inspection the bottoms were a nice golden brown.  The plain cookies taste a lot like shortbread instead of sugar cookies.  For the second batch, I cooked the cookies for exactly 8 minutes, and then took them out of the oven.  The were definitely still really soft, but after cooling for a few minutes they were perfect!.  However, my cookies were a lot thicker than if I had rolled them out so I suspect 8 minutes would be too long for thinner cookies.

So, would I buy this mix again?  Definitely.  Do they taste like real sugar cookies?  Yes- if you don't over cook them.  I hope they work out for you!

Monday, November 19, 2012

Pie Crust- 365 Recipe Challenge

For today's recipe, I had to call in some back up.  One of my favorite Thanksgiving foods, it left over turkey pot pies.  However, this requires pie crust and gluten free pie crust can be hard to come by.  My friend Lauren is the Pie Queen, and her mom is attempting to be better about being gluten free so I invited her over for some gluten free pie crust making.  I bought some new gluten free flour, and she brought her non gluten free recipe and we started experimenting.  Pamela's Gluten Free Artisan Flour is supposedly pretty darn close to real flour so we hoped we would be able to use a regular recipe.  There is a pie crust recipe on the bag, but there were extra ingredients that weren't in Lauren's recipe (like sugar and butter), so we stuck with hers and hoped for the best.

You Will Need:
1 cup flour (we used Pamela's Gluten Free Artisan Flour)
1/3 cup + 1 Tbsp shortening (mmm...Crisco- don't freak out, there isn't that much per serving)
1/2 tsp salt
Very cold water (we used approximately 10 Tbsp for 4 crusts, so about 3 Tbsp.)
pastry cutter or two butter knives
rolling pin
pie plate

Directions:
In a large bowl, mix together the flour and salt.  Drop in the shortening, and cut it into the flour with either a pastry cutter or two butter knives.  Lauren uses a butter knives, but since I have a fancy pastry cutter, I insisted on using it.  Stop once the flour mixture resembles chunky sand (isn't that a pretty mental image?).  Start mixing in the cold water, a little at a time.  

Think really old play dough.  It is a lot drier than what you think dough should look and feel like.
The mixture will still seem dry, but when you can squeeze it in your hand and it holds it's shape, it is done. Form into a mound, and turn it out onto a lightly floured counter or pastry mat, and roll in to a pie crust shape- a little bigger than your pie plate.

Kept have to stop rolling and fix the cracks.  All hope was lost  when I tried to put it in the pie plate.
This was when we realized, the gluten free flour wasn't exactly like regular flour.  If you are using gluten free flour, I recommend skipping the rolling step and just dump it straight into the pie plate.  

Faking a perfectly rolled pie crust.

Without the gluten, it tends to fall apart, so just press it around in the pan until you have a pie crust. Make the edges pretty, and fill with your favorite pie filling.

Pumpkin...yum. 

If you quadrupled the recipe like I did, just place the dough balls individually in a plastic bag and freeze until you are ready to use them.

What did we learn:
The gluten free flour is not exactly like real flour. It tasted good, but the crust seemed thinner than regular pie crust.  I suspect this is why they had the extra ingredients- to stretch it. I don't know the chemistry behind this, so I can't say for sure.  It doesn't bother me, but if you are trying to fool other people, I would either add the extra stuff on the back of the bag, or just make extra crust.  It was just as easy to make 4 crusts as it was one, so I would just divide the 4th crust equally among the other 3 to end up with a little more crust.  As usual, it is a texture issue with gluten free, but this was pretty darn close.   Also, their web site suggests adding additional water to some recipes- just be careful it doesn't get sticky.  Once cooked it wasn't crumbly, it cut beautifully, held up on the plate and most of all, it actually browned.

Even if you aren't gluten free, I recommend this pie crust recipe.  It was really easy to make.  Every other time I have tried to make crust I have over worked it or made it really complicated buy using the food processor.  All you really need is a bowl, and two butter knives (or pastry cutter).

Happy Holidays!

Thursday, November 15, 2012

Crock Pot Macaroni & Cheese- 3 recipes to choose from

Recently I got a request for Crock Pot Macaroni and Cheese.  To be honest, despite my love of the crock pot and my almost obsessive love of macaroni and cheese, I rarely make macaroni and cheese in the crock pot.  Therefor, I consulted a few of my cookbooks to come up with a good recipe.  One recipe I found I had tried before. The other was written by the crock pot people.  Having not tried the crock pot recipe, I can't honestly say what it will taste like.  However, it looks like a hybrid of the other recipe and what I would throw together in the crock pot and call it macaroni (yep, that is a Yankee Doodle reference :).  So, I am going to post the 2 cook book recipes and my recipe.  Since everyone's opinion of macaroni and cheese varies, I recommend giving these a test run before you try them on a large crowd.

My Version aka "just toss some stuff in the crock pot and call it mac and cheese"
In case you were wondering, it is absolutely possible to cook raw (uncooked pasta) in a crock pot.  Since I hate having to clean an extra pot, I like dumping my pasta, sauce and whatever veggies or meat I have into a crock pot and calling it dinner.  The pasta will absorb some of the liquid, so you end up with more of a casserole than a pasta dish with sauce.
This recipe is almost identical to oven baked macaroni and cheese.  In this case, the crock pot is the oven. I have taken my recipe for cheese sauce (no one says you cant use less milk/flour/butter and pepper jack cheese instead and call it queso) and used it as I would tomato sauce in a crock pot lasagna or baked ziti.  If you don't have a crock pot, just pour it into a baking dish and bake it in a 425 degree oven for 20-30 minutes until brown and bubbly.

You Will Need:
1 box of pasta (Ancient Harvest Quinoa & Corn or Tinkyada are some good Gluten Free options)
4 Tbsp butter (whatever you have.  Just make sure you taste the sauce before adding more salt)
3 Tbsp flour (Bob's Red Mill for gluten free)
milk, 2-4 cups (whatever you have.  As always, I use skim.  The richer the milk, the richer the sauce)
2 cups shredded cheese, plus extra to sprinkle on top (I like a mixture of cheese, but cheddar works)
salt and pepper to taste.
crock pot
cooking spray

Directions:
Over medium heat, melt the butter in a large skillet.  Whisk in the flour until you have the consistency of thin peanut butter.  Slowly add the milk, a little at a time.  Each time you add milk, be sure to whisk out the lumps before adding more milk.  If your milk is not thickening, turn up the heat a little bit.  Once you have the constancy of thin (but not runny) gravy, turn the stove down to a simmer and add your cheese.  Like the milk, add a little at a time making sure the cheese melts before adding more.  Whisk to combine.  Add salt and pepper to taste.  Mix in the uncooked pasta and pour into the crock pot (that you sprayed well with cooking spray).  Cover with the remaining cheese and cook on low for 3 hours.

My Great Aunt's version, taken from the Best of Both Worlds Cookbook
I have tested this recipe and it is delicious.  However, it does contain eggs so the texture ends up being more casserole like and it may not beed good for those with egg allergies.  Still, it is very similar to the usual oven baked macaroni and cheese- but I don't recommend it for gluten free pasta.  If you are using gluten free pasta, you may loose some of the pasta's texture since gluten free pasta doesn't stand up well to over cooking.  I should also point out, when ever you make a dish with gluten free pasta that needs to be cooked twice (boiled, then baked in the oven), you should subtract 2 minutes from the boil time.  It will finish cooking in the oven.

You Will Need:
8 oz macaroni (for gluten free, I highly recommend Tinkyada for this recipe.  It holds up the best. )
1 can evaporated milk (evaporated milk, is regular milk with less liquid.  NOT sweetened condensed)
1 tsp salt
2 eggs, beaten
16 oz grated sharp cheddar cheese
1 1/2 cups milk
4 oz melted butter

Directions:
Cook macaroni as directed on package.  Combine all ingredients in the crock pot.  Cook on low 2-3 hours.

I would recommend letting the pasta cool a bit before combining the ingredients.  Crock pots work the best when all of the ingredients are the same temperature.  Also, hot pasta + eggs = scrambled eggs.

Rival Crock Pot's Recipe
I have never tried this recipe, but I assume the crock pot people have.  It has a cooking time of 2-3 hours on HIGH, which seems weird to me.  If you try it, let me know how it works.

You Will Need:
6 cups cooked macaroni
2 Tbsp butter
4 cups evaporated milk
6 cups cheddar cheese, shredded
2 tsp salt
1/2 tsp pepper

Directions:
In a large mixing bowl, toss macaroni with butter (I'm assuming the butter should be melted, but it doesn't specify).  Stir in evaporated milk, cheese, salt and pepper.  Place in the crock pot (I would just mix it all in the crock pot instead of dirtying that other bowl), cover and cook on high for 2-3 hours.

I hope one of these recipes works out for you this holiday season.  When it comes to pasta in the crock pot, it really comes down to a texture issue.  Please feel free to comment with any questions or suggestions.
Wednesday, November 14, 2012

Green Smoothie- Bonus Holiday Recipe!

The Green Smoothie.  The first time someone suggested I drink something green, I thought they were nuts.  However, as I have come to accept and even embrace, green smoothies are a great food to add into your diet.  They are full of healthy ingredients and actually quite delicious.  Most importantly, you can't taste "the green".  They are a great recovery food after a workout or as a way to sneak in a little more nutrition.  As we approach the holidays, the almost inevitable weight gain and, admit it, the hangovers; the green smoothie will be my secret weapon to bounce back in the new year.  
Make it special, put it in a fancy glass.

You will find a lot of different green smoothie recipes on the internet.  Some of them have protein, some of them don't.  The green ingredient changes person to person.  Some people use ice, others don't.  Once you jump on the green smoothie bandwagon, so you will find a recipe you like.  I like my green smoothie to be as close to a chocolate shake as possible. I do not use ice in my green smoothies because I don't like the texture.  Instead, whenever possible, I use frozen fruit and frozen spinach.

You Will Need:
2 cups frozen spinach (you can use fresh baby spinach too, just pack as much as possible in the blender)
1 frozen banana
1 scoop Chocolate Shakeology 
1 cup water (if you need the calories, substitute your milk of choice)
*scant amount of peppermint extract
blender

*If you want a "Shamrock Shake" add a VERY SMALL amount of peppermint extract.  A little goes a long way.  I recommend adding the peppermint if you are trying to fool the kids.  Just tell them it is mint chocolate chip. 

Directions:
Starting with the water, place all of the ingredients in a blender.  Blend until smooth.  If you are using a Vitamix, you probably wont need any more water.  Other blenders might require adding a little water at a time to get things going.  Makes 1 meal or 2 snacks.  

Variations:
Spinach + 1/2 banana + 1/2 cup strawberries+ Shakeology+ 1 cup water
Spinach + 1/2 banana + 1/2 cup cherries + Shakeology + 1 cup water
Spinach + banana + 1/4 cup rolled oats, ground + chocolate B'NPB+ 1 cup cold coffee+ Shakeology